Sunday, October 17, 2010

Vegetable Fritters

Sunday night always means an easy dinner in our house, tonight we had vegetable fritters.

Cast of characters

  • 1 large zucchini grated
  • 1 carrot grated
  • 1 stick celery finely diced
  • 1 x 125g can corn kernels
  • 2 eggs lightly beaten
  • 2/3 cup Self Raising flour
  • 250g fresh reduced-fat ricotta cheese crumbled
  • 2 tablespoons grapeseed oil
Step 1
Squeeze the excess moisture from the grated zucchini. Mix zucchini, grated carrot, diced celery, flour a bowl. Add the ricotta and mix until just combined.


Step 2
Heat oil in a non stick frying pan over a medium heat. Place spoonfuls of mix into the heated pan and press lightly with the back of the spoon. Cook for for 2 - 3 minutes or until the bottom is golden brown.

Turn and cook the other side the same way.

 The finished product

My review
These fritters were really yummy. The inside of the fritters were beautifully creamy because of the cheese. I will definitely make these again.

Friday, October 15, 2010

Geoff's Chicken Bon Bon's

Tonights recipe is Geoff's Chicken Bon Bon's by Geoff Knight. Geoff loves these because they are, quick, easy and delicious!

Here are Geoff's instructions.

Geoff’s Chicken Bonbons

Take chicken thigh fillets – boneless and skinless
You can put anything you like in the filling, but my preferred is:

Sundried tomatoes (not oily ones, in fact I prefer the dried ones you can get in a packet).
Asparagus
Low fat fetta
Spinach or silverbeet

I chop up the sundried tomatoes, cut the asparagus to the length of a chicken fillet (when rolled), cut up the spinach and crumble the fetta.

Then I mix them altogether, lay the fillets out, fill the middle of the fillets with the filling then roll the fillets up as tightly as I can. It’s just like rolling a kebab or a wrap or a burrito, but remember the trick is to get as much filling in without OVER filling it, otherwise it’ll be spilling out everywhere. (Someone suggested beating the fillets flat which is actually a good idea – I haven’t done it yet because I don’t have a meat pounder).

Once you’ve got your fillets rolled, one by one, I then roll them up in foil and twist the ends like a bonbon. I’m quite generous with the foil, you don’t want it ripping.

Then I put them in my electric pan thingy (because I don’t have an oven and let them steam in their own juices for about 20-30 minutes on high. Not sure how long it’d take in an oven but I reckon an oven would do a much better job.

When they’re done I cut the ends off the foil bonbons and carefully unwrap the foil (don’t burn yourself). If you’ve wrapped the foil nice and tight then the chicken fillet should retain its rolled up shape for serving. You can cook anything else you want with them – mashed potato, gravy, etc. Whatever is to your liking.

And there you have Geoff’s chicken bonbons 

Now its my turn to try these :)
Cast of characters


  •  Chicken thigh fillets
  • Spinach leaves - I used English spinach and removed the stalks
  • Low fat fetta cheese
  • Sun dried tomatoes (non oily)
  • Asparagus
  • Prosciutto - I added this because I had some I needed to use up 

Obviously Geoff is more experience at doing this than me because I got myself into a hell of a mess at first. I tried rolling the first one and it was a disaster, after that I decided that rolling the chicken on the foil might work better for me. I was right, once I didn't have to worry about picking that little sucker up and transferring it to the foil it went quite smoothly. Well. it did until I realised I'd left the asparagus out of the first one - gggrrr


The photo obove looks a mess, I put the prosciutto on top of the thigh fillet and then added the filling, this was obviously the first one because the asparagus is missing :)


Once I put the camera down and was able to use both hands it was fairly easy to roll the chicken and contain all the filling. I did open up the first Bon Bon and add the missing asparagus.


Here are my completed Bon Bon's ready to put in the oven. I cooked them on high for a bit longer than 30 minutes as I worry about chicken being properly cooked.


The finished product. It probably looks nothing like Geoff's but I was impressed :)

Review
The chicken was really delicious and I will definitely make this again. Next time though I'll try it with mashed potatoes and gravy.

Thanks for the great recipe Geoff!!!

Mulberry Infused Apple Crumble

One of my sisters-in-law gave me a bag of mulberries on Tuesday so I thought I'd make a mulberry and apple crumble. Things didn't go exactly as planned though but I was pleased with my fix :-)

I stewed the apples and mulberries last night and didn't think to take photos - sorry.

What I did was peel, core and slice the apples into a pot. Next I spent ages getting rid of the stalks in the mulberries and added them to the pot. I thought my hands and fingers would be permanently purple after that messy job. I added some caster sugar and because the mulberries were quite juicy I only added a tiny amount of water.

The problems begain as the mulberries started cooking, they fell apart and turned into mush and hundreds of tiny little white seeds were released - YUK. Because the apples had held their shape and not gone mushy I decided to rinse off each piece individually to get rid of the mulberry mush and seeds which, while tedious, was worth it because I wouldn't fancy seeing all the seeds in the crumble.

After I'd finished that tedious job I had a brainwave about how to prevent having to deal with the seeds and mush in the future. As I still had some mulberries left I decided I needed to try iy out now as I might not get any more mulberries until next year.

I peeled and chopped more apples and cut a double layer of muslin, tipped the rest of the mulberries in the centre, gathered up all the edges and tied it securely with string. I then added the muslin bag to the apples along with some caster sugar and a couple of tablespoons of water and cooked them.

The fruit stewed in their own juices and I kept squishing the muslin bag to release all the mulberry juice. This method worked really well and there was not mushy mulberries or little whit seeds to deal with. I didn't even have to remove the stems.

Crumble recipe

Cast of characters

  • 200g plain flour
  • 1 teaspoon Baking Powder - I realised later that I forgot to add this - oops
  • 100g cold butter cut into cubes
  • 6 teaspoons Demerera (I'll check the spelling on this one) I didn't have any so I used brown sugar 
Rub the flour and baking powder together with the butter using fingertips until mix resembles coarse sand, add sugar and mix to combine.


Put stewed fruit in ovenproof dish, cover with crumble mix.


Bake until golden brown.


Serve with ice cream - yum.


Review

Because I only added a small amount of caster sugar to the fruit it was not overly sweet which I liked and I loved how the mulberry juice made the apples red. I would definitely make this again.

Thursday, October 14, 2010

Cheesy White Sauce

I am doing a separate post for the Cheesy White sauce because Tiffany still hasn't mastered this so I told her I'd do a post on it :-)

Cast of characters

  • Milk
  • Butter
  • Grated Tasty Cheese
  • Salt (not pictured)
Step 1
Melt butter and add salt - I like to use a bit more butter than is probably necessary 

Step 2
Add flour and whisk together well.to create a roux. This is where my extra butter come in handy, I find a "wet" roux works better for me than adrier crumbly one, it doesn't get lumpy whe the roux is "wet". Cook for a few minutes stirring well to cook the flour.


Step 3
Add milk a little at a time stirring constantly, the sauce will thicken very quickly during this stage. Keep stirring and adding milk until the sauce reaches the desired consistency and is totally lump free.


 Step 4
Add grated tasty cheese and continue stirring with a whisk until the cheese has completely melted and the sauce is smooth again. If the sauce is too thick after the addition of the cheese add some more milk and continue whisking.


 The finished sauce should be thick but smooth and still runny.


 Review
The most important thing with making this sauce is constant whisking to prevent lumps. If your sauce does turn out lumpy try straining it through a sieve to remove them.

Tuna Mornay

I'm posting early today because tonight Tiffany and I are going to the Comedy Store to see Craig Hill a Scottish comedian. I wanted to have something easy for dinner that could be prepared in advance and as Tuna Mornay is one of Tiffany's favourites the choice was not difficult.

Cast of characters


  • Tuna - for Tuna Mornay I use tuna in brine
  • Noodles - I use whatever noodles I have on hand, todat I used Penne Rigate
  • Milk
  • Grated Tasty Cheese
  • Butter (not pictured)
  • Plain flour
  • Salt (not pictured)
Step 1
 Cook noodles in a large pot of salted boiling water. Drain well and return to the pot.

Step 2
While the noodles are cooking make some Cheesy White Sauce (see separate post for this)


Step 3
When the sauce is made drain the tuna and add it to the sauce. Stir through carefully so that some of the tuna stays in chunks if possible. That's not really important but I like chunks :-)

Step 4
Pour sauce/tua mix over sauce and stir through until all the noodles are coated and everything is well mixed.

Step 5
Tranfer mix into an ovenproof dish and top with grated tasty cheese. I made extra today so I could send a batch home with my girls :-)


 Step 6
Cook in a hot oven until the cheese melts and goes golden brown.


Review
Always a favourite!

Wednesday, October 13, 2010

Lamb Chops

Today Tiffany called to tell me she'd bought me a copy of YOUR PLACE or mine? The new cookbook just released, authored by Gary Mehigan and George Calombaris, judges on Masterchef. Gary and George dropped into Borders unannounced and Tiffany was able to get my copy personally autographed for me :-)

No actual recipe today - sorry

Tonights dinner was lamb chops with zucchini, mushrooms and potatoes. Of course I wanted to make something from the new book. I chose potatoes but following the instructions didn't work for me and I had to do a quick fix to make them semi presentable.


Review
I will try doing the potatoes again but I will do them my way and hopefully they will work out.

Tuesday, October 12, 2010

Beef Burgundy Part 1

This is Nelly's favourite and yet another one that I don't really measure anything, I just adjust things to suit the quantity I want to make.

Cast of characters


  • Blade steak
  • Bacon
  • Carrots
  • Onions
  • Red wine - I'm not fussy what red wine I use, whatever is on special is what I buy
  • Beef stock powder or cubes
  • Plain flour
  • Tomato paste (not pictured)
  • Oil (not pictured)
Step 1
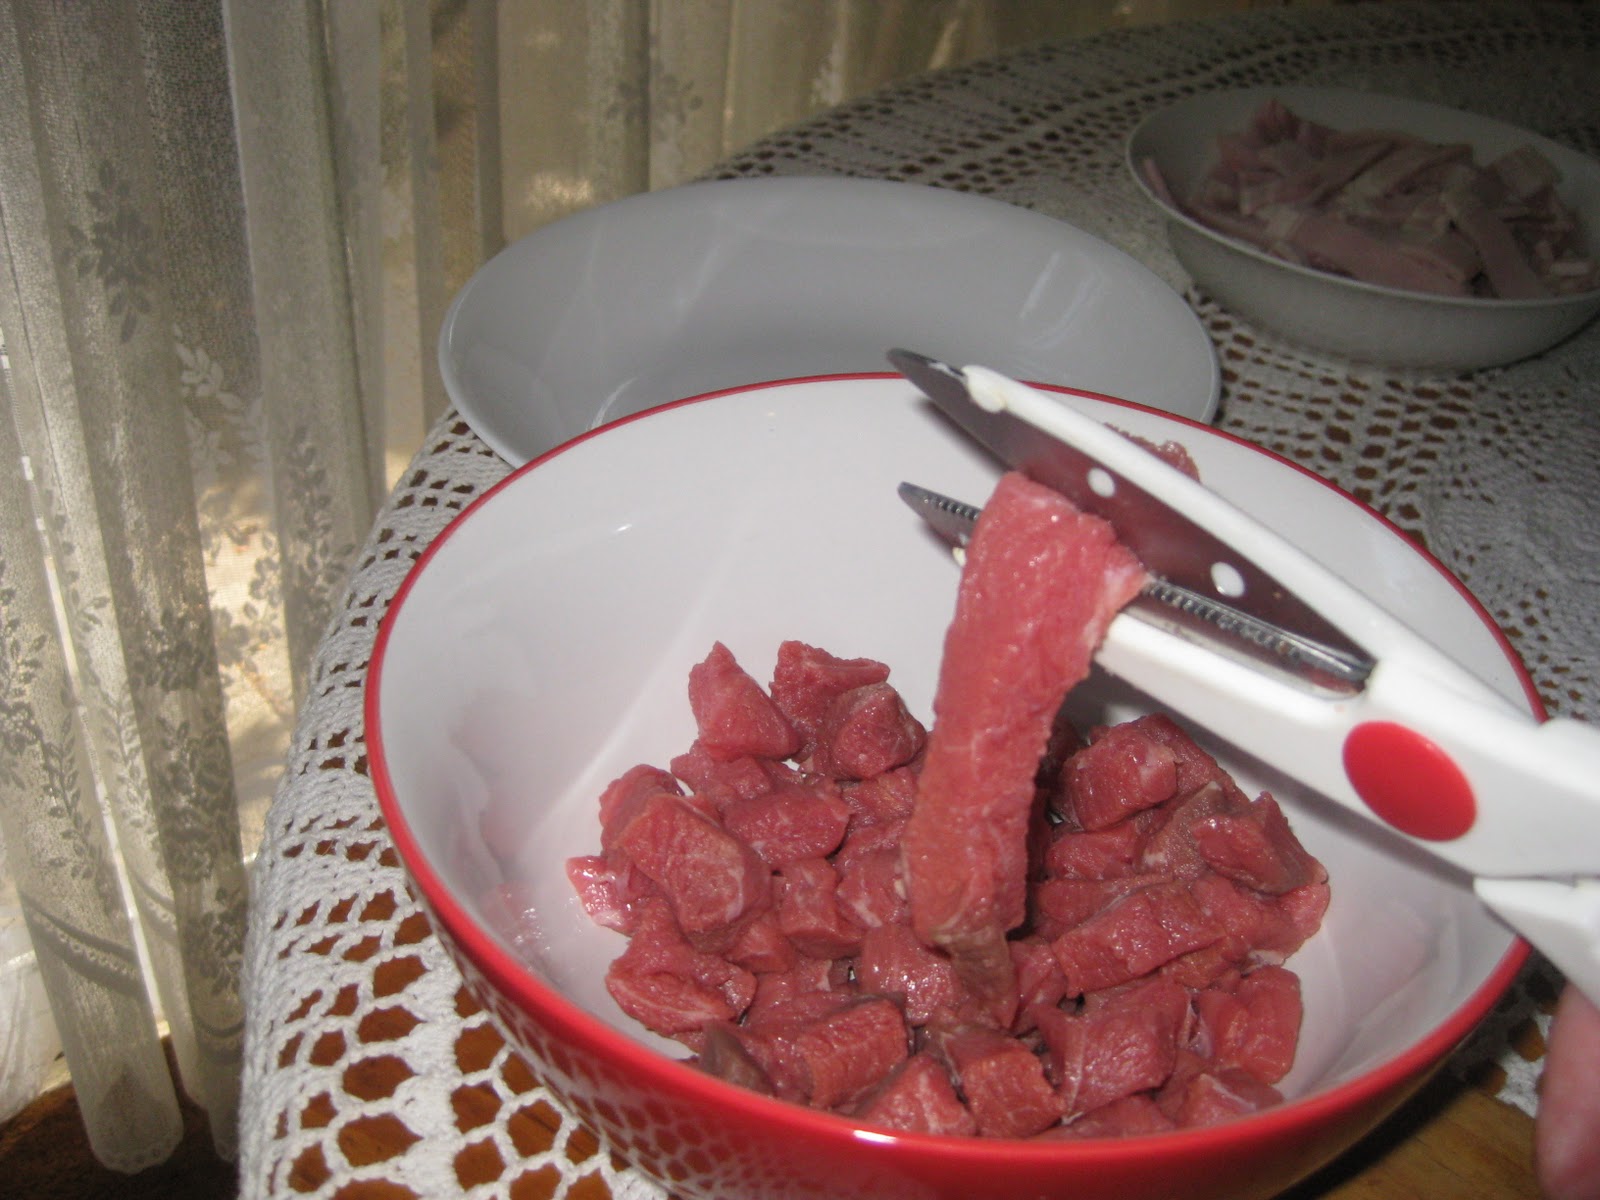
Cut away all traces of fat or sinew. Cut meat into small cubes. I'm not fussy when I do this, my lazy way of doing it is to use kitchen scissors to cut the meat into long strips and then into cubes.


Cut bacon into strips


Finely dice carrots and onions


Step 2


Add some oil to a large frying pan and cook the bacon, do not make it crispy. Remove from pan and set aside.


Brown the meat cubes in small batches and set aside


Step 3
Add the diced onions and carrots and cook for about 5 minutes.


Return the bacon and browned meat to the pan and stir through.

Step 4
Sprinkle a couple of spoons of plain flour over the top of the mixture


Step 5
Stir the flour through to cover all the meat and vegetables

SEE PREVIOUS POST FOR PART 2

Beef Burgundy Part 2

Step 6
Stir all the flour through covering all the meat and vegetables. When this is done there should be no white showing from the flour.


Step 7
Add the wine and beef stock and mix well. The sauce is very runny at this stage but it will thicken up.


Step 8
Add tomato paste and stir to combine


Step 9
Cover pan and turn the heat doen to a low simmer. Simmer for about 1.5 hours. I give it a stir about every 10 minutes to make sure it doesn't catch on the bottom of the pan


Step 10
Serve with rice or whatever you fancy - enjoy!


Review
Even though this recipe has a lot of steps it really is easy and never fails unless you forget to stir during the simmering time and the bottom burns. I set my timer every 10 minutes to make sure I don't forget.

Monday, October 11, 2010

Chicken Stuff

Another family favourite tonight, I can't remember where I got the original recipe for this but it has evolved quite a lot over the years so I guess its not important. As usual with me when I try something new I will follow the recipe faithfully the first time I make it and after that I will tweak by removing things we don't like and adding things we do. This is one of those well tweaked recipes.

While I can list what goes into it, I can't give exact quantities because I don't measure anything.

Cast of characters


  • chicken - normally I use breast fillets but I had chicken breast strips in the freezer so I used those
  • bacon
  • large flat mushrooms
  • celery
  • can of Cream of Chicken soup
  • sour cream
  • Large Vol-au-Vent cases

Step 1
Cook the chicken, I poached the strips but if you are in a hurry you can use a bought BBQ chook and pull all the meat off it.

Step 2
Cut the bacon into strips and slice the mushrooms and celery

Step 3
Pour som olive oil into a large frypan and cook the bacon, celery and mushrooms


This is why you need a large frypan, the mushrooms take up a lot of space until they are cooked.


Step 4
When the mushrooms are cooked and have reduced down in size add the Cream of Chicken Soup and sour cream and mix until well combined, add cooked chicken


The light above my stove has a tendancy to make the photos look yellow - sorry

Step 5
Heat Vol-auVent cases in the oven.  Fill with Chicken Stuff and serve.


Review
This is so easy and it never fails.Sometimes I make puff pastry fingers to serve instead of the Vol-au-Vents and sometimes I serve it with rice. The bought Vol-au-Vent cases are the easiest though.

Sunday, October 10, 2010

Banana Cake

This recipe is great if you need to feed a lot of people. It would be easy to make a half quantity if you don't want so much. I alway make the large quantity and freeze the extra cakes.

The nice thing with this recipe is you can change the fruit used. I've made it using a 450g can of pie apples which turned out really well. Next time I might try using drained crushed pineapple for a change..

Normally I make this in 3 pyrex loaf pans but this time I decided to make mini cakes using a pan that makes 8 mini 9cm x 5cm (3½" x 2") loaves. This recipe made 20 mini loaves.

Cast of characters


  • 250g margarine
  • 2 cups sugar
  • 4 eggs - as you can see in the photo I used 6 eggs but they were really small
  • 2 cups mashed banana - I had 4 bananas that needed to be used - I didn't bother measuring
  • 1 cup milk
  • 2 level teaspoons Bi-Carb Soda
  • 3½ cups Self Raising flour
  • pinch salt
I make this in a large 3.8 litre saucepan so there is less to wash up at the end :)

Step 1
Melt margarine and stir in sugar until dissolved - I leave this to cool for a bit before the next step as I really don't want any scrambled eggs in my cakes 

Step 2
Gradually add beaten eggs and mashed bananas

Step 3
Stir in half the flour and salt before adding half the milk in which the soda has been dissolved. Repeat this step with the remaining flour and salt and the remaining milk

 Now you can see why I use my largest saucepan!

Step 4

Pour into greased and lined cake pan/s and bake at 180° for at least 30 minutes until cooked through and browning


Step 5
Cool on wire rack


Dust with icing sugar or ice with lemon icing

Review
I really don't need to review this recipe because it always works but honestly - have you ever seen such cute little loaf cakes LOL. It doesn't take much to amuse me!